
Allscripts (Veradigm)
Veradigm (formerly Allscripts Healthcare Solutions)
Allscripts (Veradigm)
Complete OAuth 2.0 and FHIR R4 integration adapter for Allscripts/Veradigm EHR systems. Supports patient-facing, system-to-system, and embedded EHR launch workflows with full FHIR resource operations.
Overview
Allscripts (Veradigm)–specific OAuth 2.0 and FHIR adapter for the EHRConnect platform. It encapsulates Veradigm auth and FHIR behavior so the rest of the platform can integrate through a common interface. Veradigm (formerly Allscripts) is widely used by small-to-mid-size hospitals and physician practices across the United States.
You (your organization) must create and own Allscripts/Veradigm applications. ConnectHealth is middleware — it does NOT create apps, manage developer.veradigm.com accounts, or submit applications on your behalf, so you must have a registered Veradigm application with a Client ID before configuring any workflow in ConnectHealth.
On This Page
- 1.Before You Begin
- 2.Create Your Allscripts Application
- 3.Standalone OAuth Configuration
- 4.Backend (B2B) Configuration
- 5.Embed Launch Configuration
- 6.Unity (Proprietary API) Configuration
- 7.Scopes Reference
- 8.Use Cases
- 9.Get Your ConnectHealth API Key
- 10.API Endpoints
- 11.Sandbox & Testing
- 12.External Resources
Supported Authentication Flows
Click a card to jump to its configuration section.
Standalone OAuth
Standard OAuth 2.0 authorization code flow where users authorize access to their data via the Veradigm patient portal. Best for patient portals, health tracking apps, and third-party apps needing patient consent.
Backend to Backend (B2B)
JWT Bearer assertion flow for server-to-server authentication without any user interaction. Best for automated data sync, population health reporting, and background processing.
Embed Launch
SMART on FHIR launch flow for applications embedded within Allscripts/Veradigm EHR. The app is launched from within the EHR and receives patient context automatically. Best for clinical decision support and in-context clinical tools.
Unity (Proprietary API) NON-FHIR
Veradigm's proprietary "Magic" API for Practice Management data (scheduling, billing, delta sync) that FHIR does not expose. Server-to-server only — no OAuth, no browser, no SMART launch. Best for PM/scheduling automation and background workflows.
Key Features
- FHIR R4 resource operations (search, read, create)
- SMART endpoint discovery — auto-resolves token and authorize URLs from FHIR base URL
- JWT Bearer assertion for backend (system-to-system) authentication
- Token refresh and introspection
- Audit logging for all operations
- Multi-tenant identity resolution via FHIR base URL hostname
Before You Begin
Before configuring this integration, ensure you have the following:
- Veradigm Developer Portal account — A registered application at developer.veradigm.com
- Client credentials — Client ID from your registered Veradigm application
- FHIR base URL — Your Allscripts/Veradigm FHIR base URL (provided by your organization or from the Veradigm endpoint directory)
- Redirect URI — A publicly accessible callback URL for OAuth (Standalone and Embed Launch workflows)
- For Backend (JWT) workflow — An RSA key pair (RS256 or RS384) with the public key registered in the Veradigm developer portal
Create Your Allscripts Application
Follow these steps to create your Allscripts/Veradigm application in the Veradigm Developer Portal. Your organization owns and manages this app — developer.veradigm.com is where you'll manage credentials and configuration.
Create a Veradigm Developer Account
If you don't already have one, create a developer account at developer.veradigm.com.
- Sign up using your organization's email domain (e.g., someone@your-company.com)
- Your organization will own this account and all apps created under it
- Keep your login credentials secure
Register a New Application
In the Veradigm Developer Portal, register a new application and choose the type that matches your workflow:
- Create a new application from your Veradigm developer dashboard
- Choose your application type:
- For Standalone (patient-facing): a patient- or clinician-facing app using the OAuth 2.0 authorization code flow
- For Backend (B2B): a system/backend app using JWT Bearer assertion
- For Embed Launch (in-EHR): a SMART on FHIR EHR Launch app
- Enter an app name and description (e.g., "ConnectHealth Integration - Sandbox")
- Complete the required fields and submit
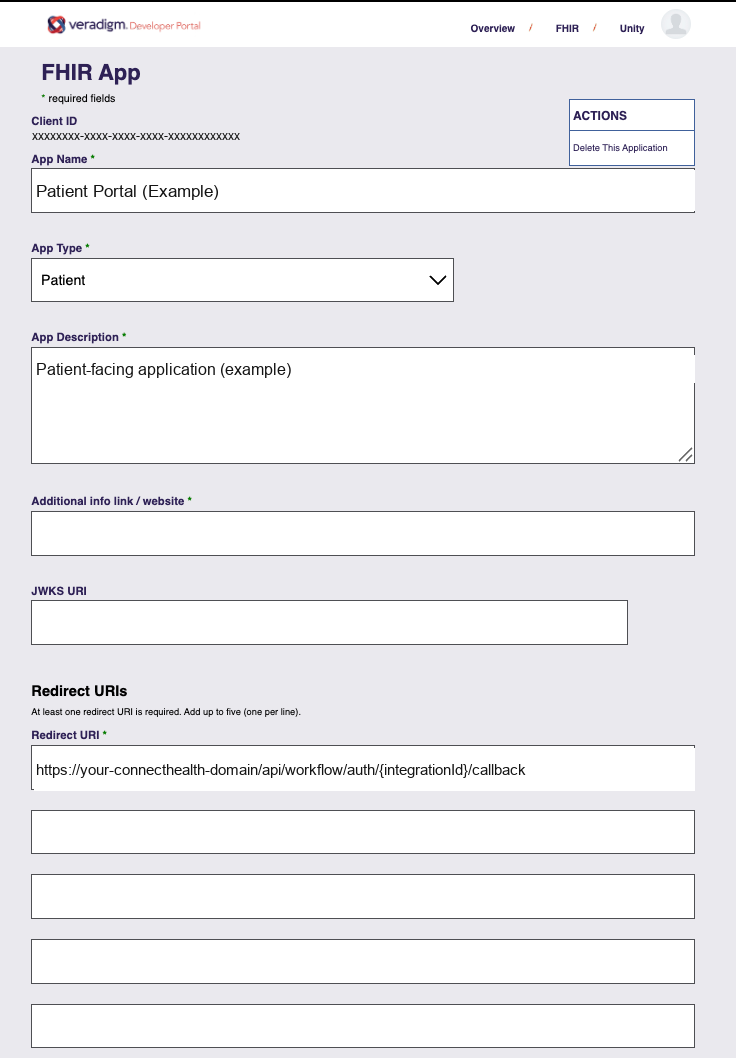
Retrieve Your Credentials and Configure URLs
After creating your app, copy your credentials and configure the required fields:
- Open your app in the Veradigm Developer Portal and copy the Client ID (and Client Secret for confidential clients)
- For Standalone and Embed Launch: Register the Redirect URI (OAuth callback URL) from ConnectHealth:
https://your-connecthealth-domain/api/workflow/auth/{integrationId}/callback
You will get the exact {integrationId} from ConnectHealth after creating your connection - For Embed Launch: Also register the Launch URL:
https://your-connecthealth-domain/api/workflow/auth/{integrationId}/launch - For B2B (Backend): Register your RSA public key (RS256 or RS384) with Veradigm — via JWKS URL or direct upload — so Veradigm can verify your signed JWT assertions
- Set the Client Type (Confidential vs Public) and, for SMART apps, the Launch URL(s). FHIR R4+ apps start as Test; request production access from Veradigm when ready.
- Save your application configuration
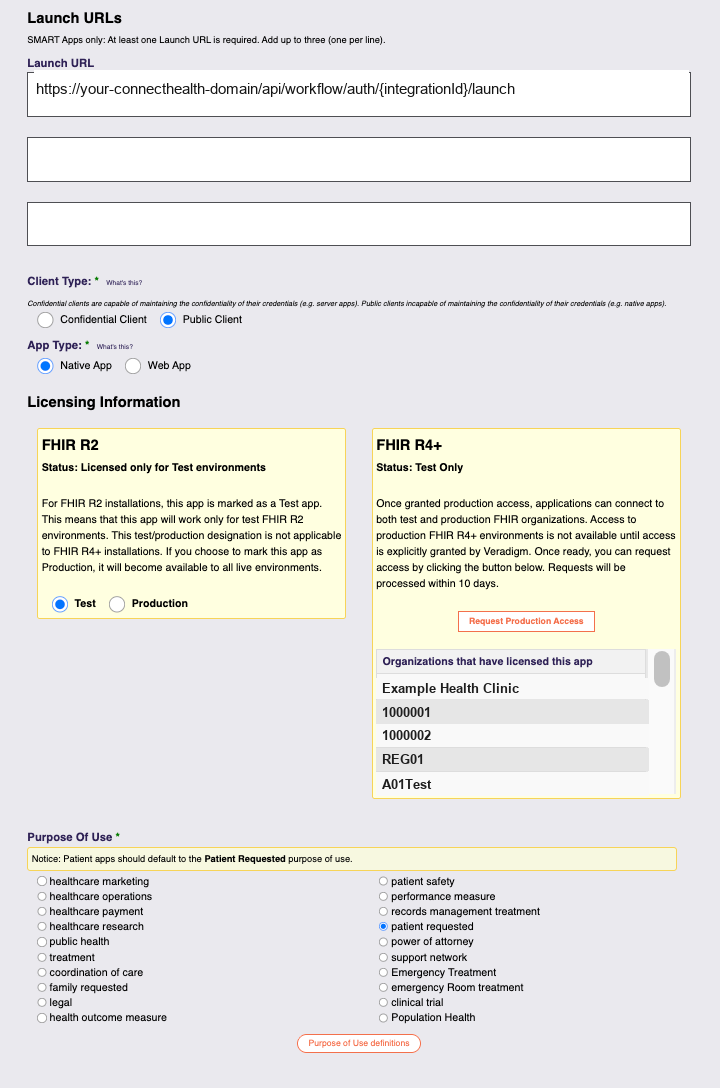
Configure in ConnectHealth
Now you're ready to configure your Allscripts/Veradigm connection in ConnectHealth:
- In ConnectHealth, navigate to Connections and create a new connection
- Select Allscripts (Veradigm) as the EHR type
- Select your workflow type:
- Standalone for patient-facing applications
- Backend for server-to-server automation
- Embed Launch for in-EHR applications
- Paste your Client ID (and Client Secret if your app is confidential)
- Fill in the FHIR Base URL — ConnectHealth auto-discovers auth and token endpoints from it via SMART configuration
- For B2B: provide the RSA private key (PEM) whose public key you registered with Veradigm
- Save your connection
Test with the Sandbox
Test your integration using your Veradigm developer sandbox (see Sandbox & Testing below for endpoint and discovery details).
- For Standalone: initiate OAuth and authorize via the Veradigm patient portal
- For Backend: request a system token and test FHIR calls against the sandbox FHIR base URL
- Verify that data flows correctly between Veradigm and ConnectHealth
Production App (When Ready)
When you're ready to go to production:
- Promote or register your application for production access in the Veradigm Developer Portal
- Configure it with the same settings as your sandbox app (Redirect URI, public key/JWKS, scopes, etc.)
- Obtain the production FHIR base URL from your customer's Allscripts/Veradigm administrator
- Create a production connection in ConnectHealth using your production Client ID and the customer's FHIR base URL
Configuration Reference
Complete the steps above (create and register your Veradigm application) before filling in these fields. You will need your Client ID and a registered Veradigm application to proceed.
EHRConnect supports multiple workflow types for this integration. Choose the one that matches your use case.
Standalone OAuth
Standard OAuth 2.0 authorization code flow where users authorize access to their data via the Veradigm patient portal.
| Field | Autofill | Required | Description |
|---|---|---|---|
Client ID |
No | Yes | Your unique application identifier from the Veradigm Developer Portal registration. |
Client Secret |
No | Yes | Client secret for confidential clients. Keep this secure and never expose in client-side code. |
Authorization URL |
Yes | Yes | Veradigm OAuth authorization endpoint URL. Auto-discovered from FHIR base URL via SMART configuration. |
Token URL |
Yes | Yes | Veradigm OAuth token endpoint URL. Auto-discovered from FHIR base URL via SMART configuration. |
Scopes |
No | Yes | Space-separated list of OAuth scopes (e.g., patient/*.read openid fhirUser launch/patient offline_access). |
Redirect URL |
Yes | Yes | Your application's callback URL where Veradigm redirects after authorization. |
FHIR Base URL |
No | Yes | The base URL of the Allscripts/Veradigm FHIR server you are connecting to. |
Setup Steps
- Register your application at developer.veradigm.com and note the Client ID and Client Secret.
- Register your redirect URI (callback URL) in the Veradigm application settings.
- Obtain the FHIR base URL from your Veradigm environment or the endpoint directory.
- Configure the Standalone workflow in EHRConnect with all the fields above.
- Test the authorization flow by initiating a login — the user should be redirected to Veradigm to authorize.
Backend to Backend (B2B)
JWT Bearer assertion flow for server-to-server authentication. No user interaction required. Best for automated data sync and background processing.
| Field | Autofill | Required | Description |
|---|---|---|---|
Client ID |
No | Yes | Your unique application identifier from the Veradigm Developer Portal. |
JWKS Private Key |
No | Yes | PEM-encoded RSA private key used to sign JWT assertions. The matching public key must be registered with Veradigm. |
Token URL |
Yes | Yes | Veradigm OAuth token endpoint URL. Auto-discovered from FHIR base URL via SMART configuration. |
FHIR Base URL |
No | Yes | The base URL of the Allscripts/Veradigm FHIR server. |
Scopes |
No | Yes | Space-separated list of system-level OAuth scopes (e.g., system/*.read). |
Setup Steps
- Register your application as a Backend/System application in the Veradigm Developer Portal.
- Generate an RSA key pair and register the public key in the portal (via JWKS URL or direct upload).
- Configure the Backend workflow in EHRConnect with your Client ID, private key PEM, Token URL, FHIR Base URL, and scopes.
- Test by requesting a backend token — no user interaction should be required.
SMART on FHIR - Embed Launch
SMART on FHIR launch flow for applications embedded within Allscripts/Veradigm EHR. The app is launched from within the EHR and receives patient context automatically.
| Field | Autofill | Required | Description |
|---|---|---|---|
Client ID |
No | Yes | Your unique application identifier from the Veradigm Developer Portal. |
Client Secret |
No | No | Client secret for confidential clients. Optional for public clients. |
Setup Steps
- Register your application with Veradigm as a SMART on FHIR EHR Launch application.
- Configure the launch URL where Veradigm will send the
issandlaunchparameters (use the EHRConnect launch URL shown in your connection). - Configure the Embed Launch workflow in EHRConnect with the Client ID and Client Secret if required.
- Test by launching your app from within the Allscripts/Veradigm EHR environment.
Unity (Proprietary API)
Veradigm's proprietary "Magic" API (also called Unity) for clinical and Practice Management data — schedule retrieval, delta patient sync, encounters, orders/results, vitals, notes, and PM-specific fields that the FHIR API does not expose. Unlike the OAuth/SMART workflows above, Unity is a server-to-server integration: there is no OAuth redirect, no browser, and no consent screen. The practice configures provider credentials once, and ConnectHealth authenticates silently on every call. Best for background automation such as sync jobs and scheduled reports.
Service credentials (Service Username + Password) are issued by Veradigm when your app is registered and prove your app is licensed (used for GetToken). EHR credentials (EHR Username + Password) are the provider's login at the practice and authenticate you as that provider (used for GetUserAuthentication). You need both — a token without EHR auth cannot execute any data actions.
| Field | Autofill | Required | Description |
|---|---|---|---|
Unity URL |
No | Yes | The Unity service base URL (e.g. https://<server>/Unity/UnityService.svc). ConnectHealth appends the /json suffix automatically. |
App Name |
No | Yes | Your registered application name, sent on Magic actions. |
Service Username |
No | Yes | Service credential issued by Veradigm at app registration (not an EHR user). Used for GetToken. |
Service Password |
No | Yes | Password for the service credential. Stored securely in AWS Secrets Manager. |
Ubiquity ID |
No | No | Ubiquity customer prefix for cloud-to-on-premise routing (e.g. VHCP001PM:PMGA02^8^). Omit for a direct connection. |
EHR Username |
No | Yes | The provider's login in the Allscripts PM/EHR system. Used for GetUserAuthentication. |
EHR Password |
No | Yes | The provider's password. Stored securely in AWS Secrets Manager. |
How Unity Authentication Works
Every Unity session follows a fixed 3-step sequence — ConnectHealth handles all of it for you once the fields above are configured:
- GetToken — service credentials (plus Ubiquity routing, if set) return a UUID security token.
- GetUserAuthentication — the EHR provider login authenticates into the session.
- MagicJson actions — all data operations (e.g.
GetPatient,GetSchedule,SaveOrder) post to a single/json/MagicJsonendpoint with anActionparameter.
Tokens expire after 20 minutes of inactivity; ConnectHealth caches them for 18 minutes and refreshes the timer on each action. RetireToken is called on cleanup. Note: Unity always returns HTTP 200 — failures are reported in the body as "Magic Error ...".
Common Magic Actions
A representative subset. The full action catalog (~120 actions across Demographics, Encounter, Order, Document, PAMI, Vitals, Schedule, Task, and more) is in the Veradigm EHR API Reference.
| Action | Description |
|---|---|
GetPatient | Read basic demographics by Patient ID (use GetPatientFull for insurance too) |
GetPatientByMRN | Read a patient by MRN |
SearchPatients | Search patients by arbitrary parameters (max 100 results) |
GetChangedPatients | Delta sync — Patient IDs changed since a given date/time |
GetClinicalSummary | Summary of allergies, vitals, medications, immunizations, etc. |
GetSchedule | List appointments for a date or date range (read-only) |
GetEncounter | Find a patient's encounter |
GetOrders / GetResults | Read orders and lab/procedure results |
SaveOrder | Write an order (lab, referral, procedure, administered medication) |
SaveVitalsData | Write vitals (temperature, BP, weight, height, pulse, etc.) |
SaveNote | Create an RTF clinical note (creates encounter/visit if needed) |
SaveAllergy / SaveImmunization | Create or update allergies and immunizations |
Setup Steps
- Obtain your Service Username/Password from Veradigm when your Unity application is registered.
- Get the provider's EHR Username/Password from the practice/customer.
- Determine your Unity URL, and your Ubiquity ID if connecting to an on-premise server via Ubiquity.
- Create a connection in ConnectHealth, select Allscripts (Veradigm) and the Unity workflow, and fill in the seven fields above.
- Run the Test Connection — it validates all three steps (GetToken → GetUserAuthentication → GetServerInfo).
- Build workflows with the
ec-unity-authandec-unity-actionNode-RED nodes, or call the action endpoint directly (see API Endpoints).
General Scopes
Scopes define the level of access your application requests. Choose the appropriate scopes based on your workflow type and data needs. Refer to the Veradigm FHIR documentation for the full list of supported scopes for your registered application.
Note: Scopes apply to the OAuth/SMART workflows only. The Unity (Proprietary API) workflow has no scope concept — access is governed by the permissions of the EHR provider account you authenticate with.
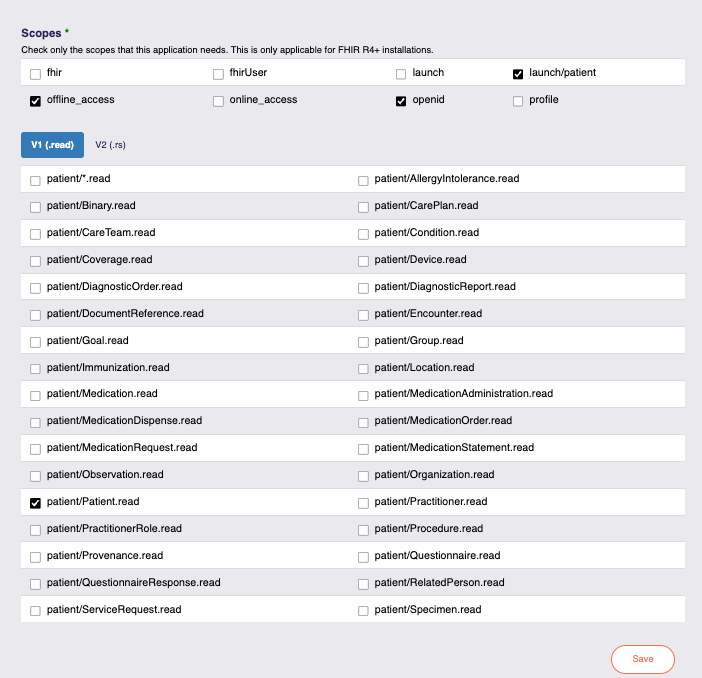
launch/patient, offline_access, openid, and the specific patient/*.read resources.Patient Scopes
Patient-level scopes grant access to data for a specific patient who has authorized the application.
| Scope | Description |
|---|---|
patient/*.read |
Read all resource types for the authorized patient |
patient/Patient.read |
Read the patient's demographic information |
patient/Observation.read |
Read clinical observations (vitals, lab results) for the patient |
patient/Condition.read |
Read diagnoses and conditions for the patient |
patient/MedicationRequest.read |
Read medication orders and prescriptions for the patient |
offline_access |
Request a refresh token for long-lived access |
System Scopes
System-level scopes for backend/server applications. Used with the Backend (B2B) workflow.
| Scope | Description |
|---|---|
system/*.read |
Read all resource types at the system level |
system/Patient.read |
Read patient records at the system level |
Launch & Identity Scopes
| Scope | Description |
|---|---|
launch |
Required for EHR launch — receives the launch context from Allscripts/Veradigm |
launch/patient |
Requests patient context at launch time (standalone flow) |
openid |
OpenID Connect — returns an ID token |
fhirUser |
Returns the FHIR resource URL of the authenticated user |
Use Cases
Choose the workflow type that best matches your application's needs.
Patient-Facing Applications
Scenario: A third-party app needs to access patient health data with the patient's explicit consent.
Recommended Workflow: standalone
Best For: Patient portals, Health tracking apps, Care management tools, Personal health records
System-to-System Integration
Scenario: A server needs to access Allscripts/Veradigm data without any user interaction.
Recommended Workflow: backend
Best For: Automated data sync, Population health analytics, Reporting pipelines, EHR-to-EHR data migration
EHR-Embedded Applications
Scenario: An application launched from within the Allscripts/Veradigm EHR that needs patient context.
Recommended Workflow: embed_launch
Best For: Clinical decision support, Order entry helpers, Documentation assistants, In-workflow tools
Practice Management & Clinical Data Automation
Scenario: A server needs schedule, encounter, or PM-specific data that the Allscripts FHIR API does not expose, with no user in the loop.
Recommended Workflow: unity (proprietary)
Best For: Delta patient sync (GetChangedPatients), schedule retrieval (GetSchedule), clinical summary export, write-back of orders/vitals/notes (SaveOrder, SaveVitalsData, SaveNote), background automation
Get Your ConnectHealth API Key
Several ConnectHealth endpoints — Token Exchange, Backend Token, and Token Refresh — require a ConnectHealth API key passed as the x-api-key header. Without this header, these endpoints return 401 Unauthorized. Follow these steps to create your API key.
Log in to the ConnectHealth Dashboard
Open your ConnectHealth instance (the URL where your deployment is hosted) and sign in with your account credentials.
Navigate to Settings → API Keys
From the left navigation, click Settings, then open the API Keys tab. If you have never generated a key before, the list will be empty.
Create a New API Key
Click Create API Key, enter a descriptive name (e.g., allscripts-prod-client or embed-launch-dev), and submit. Use one key per environment or per client application so you can rotate individual keys without affecting others.
Copy Your API Key
ConnectHealth automatically saves your API key securely. You can view and copy the key value from Settings → API Keys at any time. Click your key name to reveal and copy it whenever you need it.
Use the Key in the x-api-key Header
Pass the key on every request to a protected endpoint using the header name x-api-key (lowercase, hyphenated). Example:
curl -X GET "https://<your-ch-domain>/api/workflow/auth/{integrationId}/token" \
  -H "x-api-key: YOUR_API_KEY" \
  -H "Accept: application/json"
Endpoints requiring this header are listed in the API Endpoints section below.
API Endpoints
These are the ConnectHealth endpoints your application will interact with for Allscripts/Veradigm integrations. All paths are prefixed with /api/workflow/auth/{integrationId}, where {integrationId} is the connection ID you created in ConnectHealth.
Token Exchange, Backend Token, and Token Refresh all require the x-api-key header. Create a key from Settings → API Keys before calling these endpoints.
Authentication Endpoints
| Method | Endpoint | Description | API Key |
|---|---|---|---|
GET |
/api/workflow/auth/{integrationId}/start |
Initiate OAuth flow for standalone launch. Typically hit from a browser; returns a redirect to the Veradigm patient portal. | No |
GET |
/api/workflow/auth/{integrationId}/callback |
OAuth redirect URI. Called by Veradigm after user authorization — not by your client. Exchanges the code for tokens and stores them, returning a one-time tokenId. |
No |
GET |
/api/workflow/auth/{integrationId}/launch |
SMART on FHIR EHR Launch URL. Called by Veradigm with iss and launch query params — not by your client. ConnectHealth auto-discovers SMART endpoints from iss. |
No |
GET |
/api/workflow/auth/{integrationId}/token/exchange/{tokenId} |
Exchange a one-time tokenId for the actual access token and patient/encounter context. The tokenId is consumed on read. |
Yes |
GET |
/api/workflow/auth/{integrationId}/token |
Request a Backend (B2B) system token using JWT Bearer assertion. No user interaction. | Yes |
POST |
/api/workflow/auth/{integrationId}/token/refresh |
Refresh an expiring access token. Requires a previously issued refresh token (requested via offline_access scope). |
Yes |
GET |
/api/workflow/auth/{integrationId}/token/status/{tokenId} |
Check whether a tokenId is still valid and ready to exchange. Does not consume the token. |
No |
GET |
/api/workflow/auth/{integrationId}/introspect |
Optional diagnostic endpoint that inspects the currently stored token for the integration. | No |
GET |
/api/workflow/auth/{integrationId}/health |
Optional liveness check for the integration's auth pipeline. | No |
Unity (Proprietary API) Endpoint
The Unity workflow does not use the OAuth endpoints above. It exposes a single action endpoint that executes any Magic action (routed through the audited proprietary service). ConnectHealth manages the GetToken / GetUserAuthentication session for you.
| Method | Endpoint | Description | API Key |
|---|---|---|---|
POST |
/api/{integrationId}/{env}/allscripts/unity/action |
Execute any Magic action. Body: { action, patientId, parameter1..6, data }. Returns the unwrapped Magic result. |
Yes |
POST |
/api/integrations/{integrationId}/validate |
Run the 3-step Unity connection test (GetToken → GetUserAuthentication → GetServerInfo). | Yes |
Examples
Copy-paste examples for the client-callable endpoints. Replace <your-ch-domain>, {integrationId}, {tokenId}, and YOUR_API_KEY with your actual values.
Token Exchange
Exchange a one-time tokenId for an access token + patient/encounter context after Standalone or Embed Launch flows.
curl
curl -X GET "https://<your-ch-domain>/api/workflow/auth/{integrationId}/token/exchange/{tokenId}" \
  -H "x-api-key: YOUR_API_KEY" \
  -H "Accept: application/json"
JavaScript (fetch)
const res = await fetch(
  `https://<your-ch-domain>/api/workflow/auth/${integrationId}/token/exchange/${tokenId}`,
  {
    headers: {
      "x-api-key": process.env.CH_API_KEY,
      "Accept": "application/json",
    },
  }
);
const { access_token, patient, encounter, scope, expires_in } = await res.json();
Backend Token (B2B)
Request a system-level access token for server-to-server flows using JWT Bearer assertion.
curl
curl -X GET "https://<your-ch-domain>/api/workflow/auth/{integrationId}/token" \
  -H "x-api-key: YOUR_API_KEY" \
  -H "Accept: application/json"
JavaScript (fetch)
const res = await fetch(
  `https://<your-ch-domain>/api/workflow/auth/${integrationId}/token`,
  {
    headers: {
      "x-api-key": process.env.CH_API_KEY,
      "Accept": "application/json",
    },
  }
);
const { access_token, expires_in, scope } = await res.json();
Token Refresh
Refresh an access token before expiry. Only works if the original token was issued with offline_access.
curl
curl -X POST "https://<your-ch-domain>/api/workflow/auth/{integrationId}/token/refresh" \
  -H "x-api-key: YOUR_API_KEY" \
  -H "Content-Type: application/json" \
  -d '{"refresh_token": "YOUR_REFRESH_TOKEN"}'
JavaScript (fetch)
const res = await fetch(
  `https://<your-ch-domain>/api/workflow/auth/${integrationId}/token/refresh`,
  {
    method: "POST",
    headers: {
      "x-api-key": process.env.CH_API_KEY,
      "Content-Type": "application/json",
    },
    body: JSON.stringify({ refresh_token: "YOUR_REFRESH_TOKEN" }),
  }
);
const { access_token, refresh_token, expires_in } = await res.json();
Response
{
  "body": {
    "access_token": "eyJhbGc...",
    "refresh_token": "dGhpcyBp...",
    "token_type": "Bearer",
    "expires_in": 3600,
    "scope": "patient/*.read",
    "patient": "patient-id-if-applicable"
  },
  "message": "Token refreshed successfully",
  "timestamp": 1718000000000
}
Token Status
Check if a one-time tokenId is still valid and ready to exchange. Non-consuming.
curl
curl -X GET "https://<your-ch-domain>/api/workflow/auth/{integrationId}/token/status/{tokenId}" \
  -H "Accept: application/json"
JavaScript (fetch)
const res = await fetch(
  `https://<your-ch-domain>/api/workflow/auth/${integrationId}/token/status/${tokenId}`,
  { headers: { "Accept": "application/json" } }
);
const { valid, expiresAt } = await res.json();
OAuth Start (browser-initiated)
Begin the Standalone OAuth flow. Typically opened in a browser so the user can authorize with the Veradigm patient portal.
curl (inspect redirect only)
curl -I "https://<your-ch-domain>/api/workflow/auth/{integrationId}/start"Sandbox & Testing
Veradigm provides a developer sandbox through the Veradigm Developer Portal. Register your application there to receive sandbox credentials and FHIR endpoint details.
FHIR Base URL
The FHIR base URL is specific to your registered organization and environment. Obtain it from:
- Your Veradigm developer sandbox registration confirmation
- The Veradigm FHIR documentation
- Your Allscripts/Veradigm system administrator
OAuth URLs (token_url, authorize_url)
Token and authorization endpoints can be discovered automatically from the FHIR server's SMART configuration:
- Request:
GET {fhir_base_url}/.well-known/smart-configuration - From the JSON response, use
token_endpointas token_url andauthorization_endpointas authorize_url.
EHRConnect performs this discovery automatically when you provide the FHIR Base URL. Manual entry of token and authorize URLs is also supported if your environment does not expose the SMART configuration endpoint.
B2B (Backend) Test Configuration
For a backend system app registered in the Veradigm developer portal, configure your integration with:
- FHIR Base URL: as provided in your sandbox registration
- Token URL: from
/.well-known/smart-configurationtoken_endpoint - Scopes:
system/*.read(or as approved for your registered application) - Client ID: your app's Client ID from the portal
- JWKS Private Key: your RSA private key (PEM format) whose public key is registered with Veradigm
Unity (Proprietary API) Test Configuration
Unity does not use FHIR base URLs or SMART discovery. Testing requires the two credential sets and (for on-premise servers) Ubiquity routing. Configure your Unity connection with:
- Unity URL: your Unity service endpoint (e.g.
https://<server>/Unity/UnityService.svc) - Service Username / Password: service credentials issued by Veradigm at app registration
- EHR Username / Password: a provider login in the practice's Allscripts PM/EHR
- Ubiquity ID: required only when reaching an on-premise server via Ubiquity (e.g.
VHCP001PM:PMGA02^8^); omit for a direct connection - App Name: your registered application name
Validate the connection with ConnectHealth's Test Connection, which runs the full 3-step chain: GetToken → GetUserAuthentication → GetServerInfo. For a lightweight check, the Echo action round-trips the values you send (no security token needed unless you are using Ubiquity), and LastLogs helps diagnose HTTP 500s. Remember: Unity returns HTTP 200 even on failure — inspect the body for "Magic Error ...".