
TouchWorks
Altera Digital Health
TouchWorks
Complete OAuth 2.0 and FHIR R4 integration adapter for TouchWorks EHR (Altera Digital Health). Supports patient-facing, system-to-system (Basic Auth or JWT assertion), and embedded EHR launch workflows with full FHIR resource CRUD operations.
Overview
ConnectHealth's Altera Digital Health (formerly Allscripts) TouchWorks integration provides your application with secure access to patient data and clinical workflows through the Altera FHIR API. ConnectHealth encapsulates Altera's unique dual-authentication backend rules (supporting both Basic Auth and asymmetric JWT capabilities) so the rest of your platform can integrate seamlessly through a common interface.
You (your organization) must independently create and own TouchWorks applications. ConnectHealth is middleware — it does NOT create apps, manage Altera Developer accounts, or handle organizational validations on your behalf, so you must have an approved application with an active Client ID before configuring workflows in ConnectHealth.
On This Page
Supported Authentication Flows
Click a card to jump to its configuration section.
Standalone OAuth
Standard OAuth 2.0 authorization code flow where users authorize access. Best for patient portals, health tracking apps, and tools requiring consent.
Backend to Backend (B2B)
Client credentials flow offering both Basic Auth and JWT (JWKS) assertion. Best for automated data sync and background processing.
Embed Launch
SMART on FHIR launch flow for tools embedded directly within the TouchWorks clinical interface. Reads patient and encounter context automatically.
Key Features
- FHIR R4 resource CRUD operations
- Dual backend auth methods handled natively (Basic Auth & JWT assertion)
- Automatic scope normalization (auto-injects openid and fhirUser requirements)
- Token refresh lifecycle management
- End-to-end Audit logging for HIPAA tracking
Before You Begin
The Altera Digital Health developer ecosystem requires applications to be registered through the Altera Developer Portal.
Prerequisites Checklist
- Developer Account — Registered with the Altera Developer Portal
- Client ID & Secret — Assigned by the portal after creating a System, Patient, or Provider app
- Callback Redirect URI — Perfectly matched to your ConnectHealth route
- For B2B JWT: JWKS URI registered — The ConnectHealth-issued public key path given to Altera
Create Your TouchWorks Application
Follow these steps to generate your exact credentials within the Altera developer framework.
Developer Portal Sign-up
Log in or create a developer instance at the Altera Developer Portal.
Register the Application & URLs
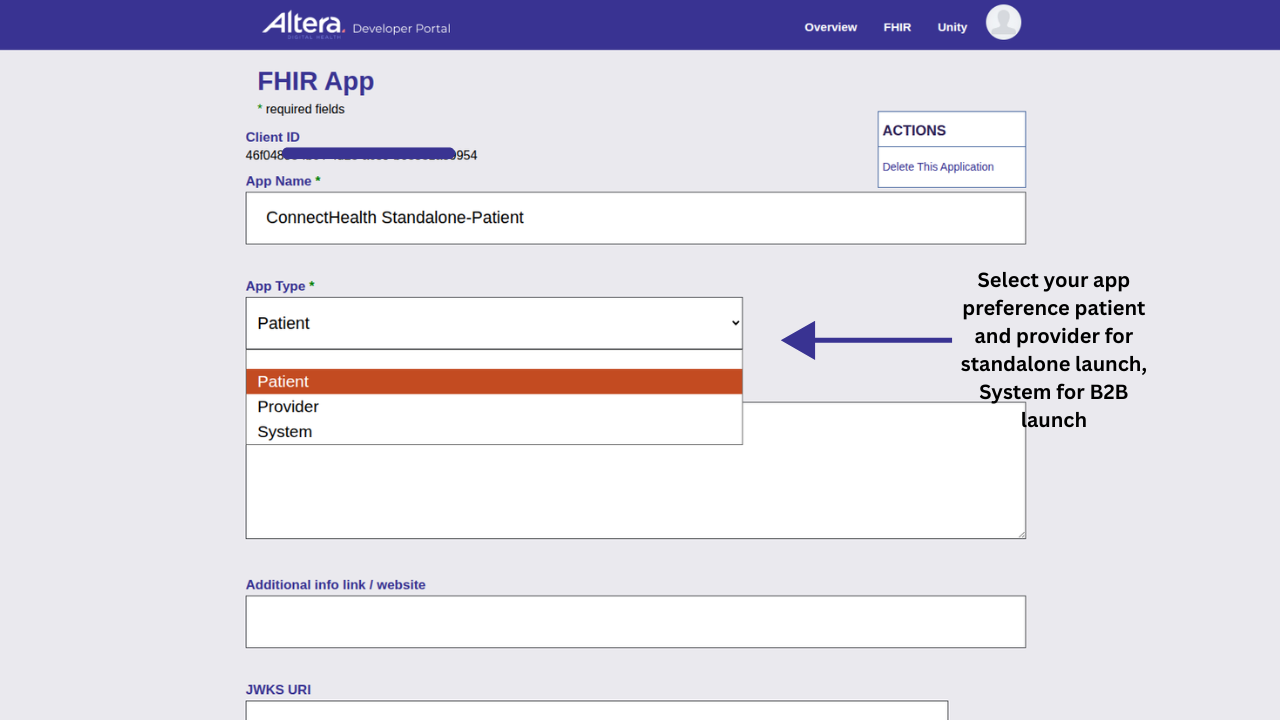
Create a new FHIR application in the Altera Developer Portal. The form has three key classification fields:
- App Type — Select Patient or Provider for Standalone OAuth and Embed Launch flows; select System for Backend (B2B) flows.
- Client Type — Select Confidential Client for server-side apps (System/B2B and backend web apps capable of keeping secrets); select Public Client for native or browser apps. Most ConnectHealth integrations use Confidential.
- App Format — Select Web App for server-rendered / backend integrations; Native App for device/mobile apps.
Then fill in the URL fields:
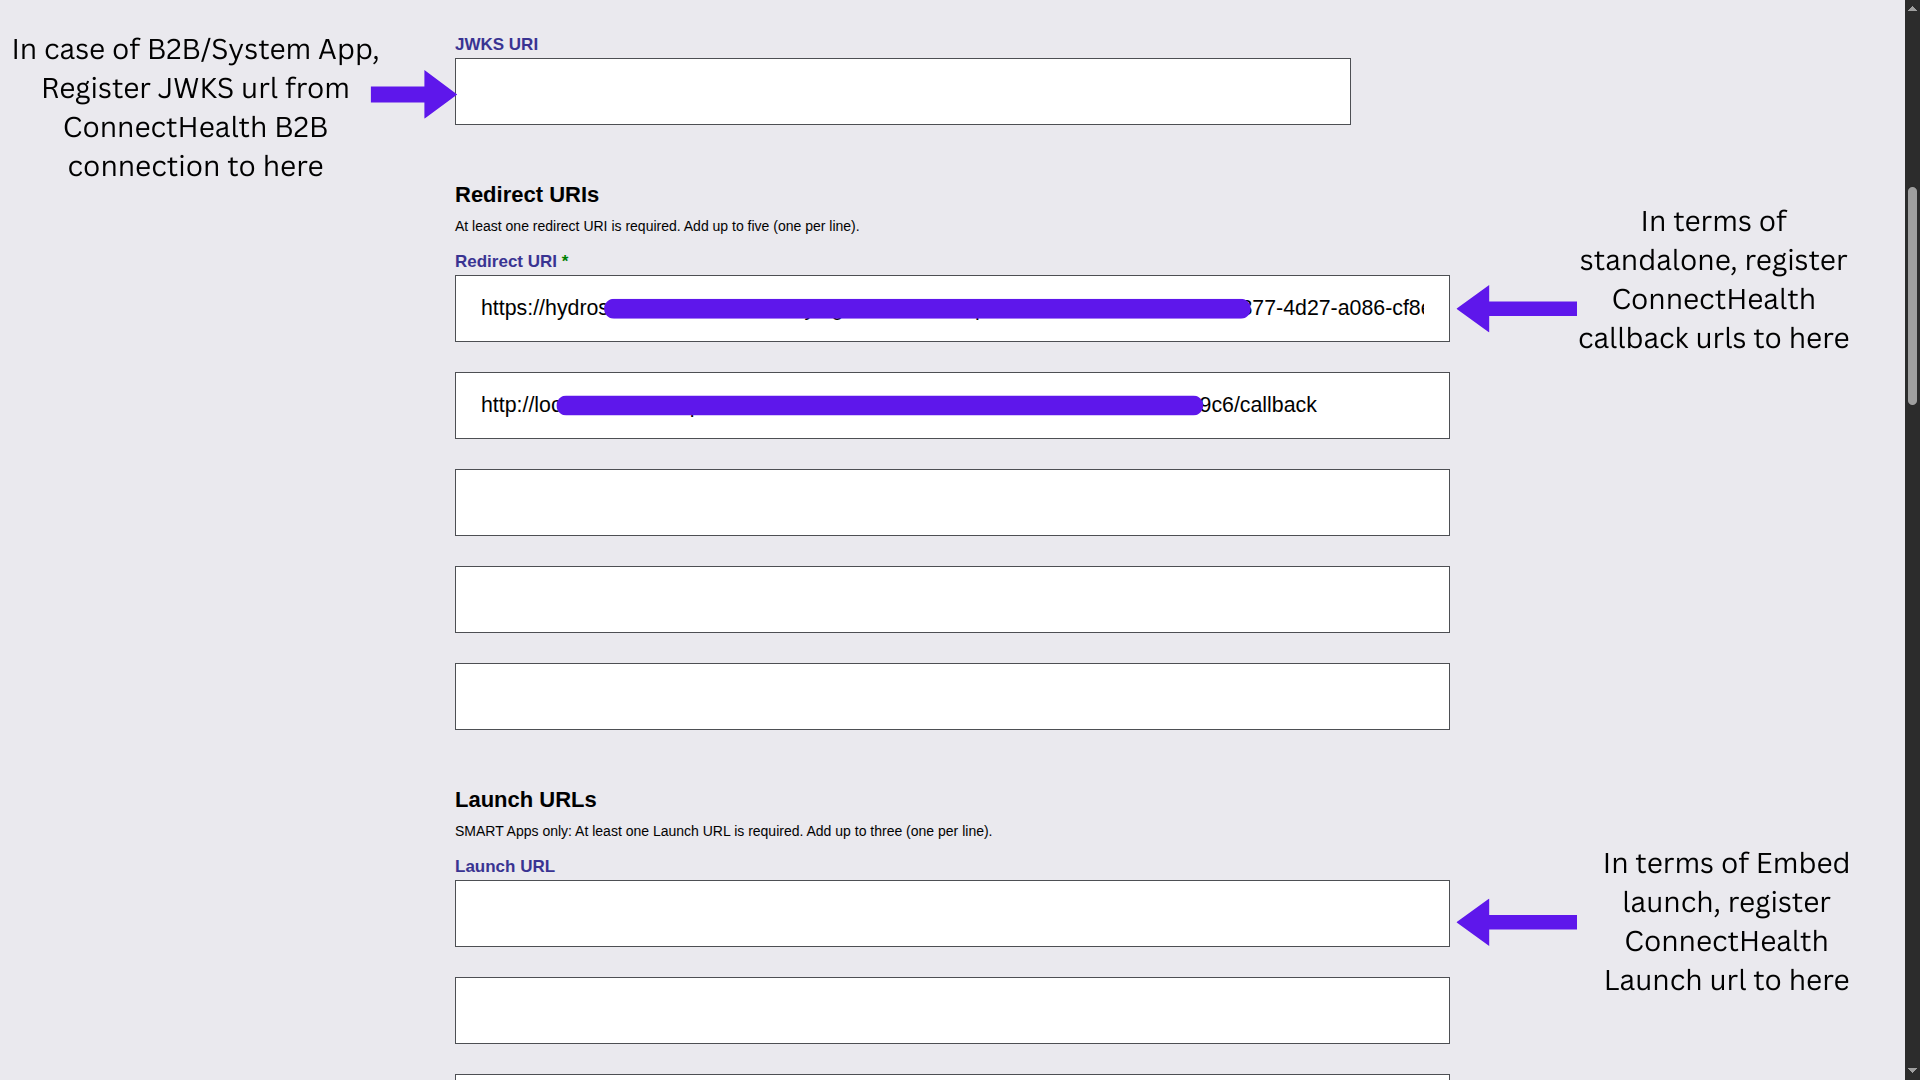
- JWKS URI — For B2B/System apps using JWT assertion: paste the JWKS URI copied from your ConnectHealth connection settings.
- Redirect URIs — For Standalone and Embed Launch: register the ConnectHealth OAuth callback:
https://your-connecthealth-domain/api/workflow/auth/{integrationId}/callback(no trailing slash). Up to 5 URIs can be registered (one per line). - Launch URLs — For Embed Launch (SMART) apps only: register the ConnectHealth launch URL:
https://your-connecthealth-domain/api/workflow/auth/{integrationId}/launch. Up to 3 Launch URLs can be registered. - Your Client ID is displayed at the top of the form — copy it to use in ConnectHealth.
/launch URL here for SMART on FHIR Embed Launch apps onlyChoose B2B Security (System Apps Only)
Altera provides flexibility. You may either use the traditional Client Secret (Basic Auth) or request to map a JWKS Public Key String for JWT assertions depending on your hospital's security policy.
Finalize inside ConnectHealth
Finish setting up your Connection in ConnectHealth by dropping in the registered credentials, verifying the Scopes, and designating the Base URLs.
Production Activation
FHIR R4+ production access is not available automatically — once your sandbox app is tested and ready, you must request production access via the button in your app's FHIR R4+ status section in the Altera Developer Portal, and Altera reviews and processes requests within 10 business days. Once Altera grants access, your app becomes available to live clinical organizations, though individual organizations must still license/enable it through their own TouchWorks Admin portal before your app can connect to their data.
Sandbox Environment Setup
For applications licensed to test within the Altera ADP Open TouchWorks Sandbox ecosystem, rely on the following explicit Endpoints.
TouchWorks Sandbox URLs — R4 Provider / System Access
Use these endpoints for Standalone (provider-facing), Backend (B2B / System), and SMART on FHIR Embed Launch workflows.
| Purpose | URL |
|---|---|
| FHIR Base (R4) | https://tw-fhir-r4.adpsandbox.ahcentral.com/R4/fhir-R4 |
| Authorization URL | https://tw-fhir-r4.adpsandbox.ahcentral.com/authorizationV2-R4/connect/authorize |
| Token URL | https://tw-fhir-r4.adpsandbox.ahcentral.com/authorizationV2-R4/connect/token |
| SMART Configuration | https://tw-fhir-r4.adpsandbox.ahcentral.com/R4/fhir-R4/.well-known/smart-configuration |
| Default Scope | launch user/*.read |
TouchWorks Sandbox URLs — R4 Patient Access
Use these endpoints only when your Standalone flow targets the patient portal persona (patient-facing apps).
| Purpose | URL |
|---|---|
| FHIR Base (R4) | https://tw-fhir-r4.adpsandbox.ahcentral.com/R4/open-R4 |
| Authorization URL | https://main.open.ahcentral.com/fhirroute/patientauthv2/1821ee4d-7ef1-4cbd-a56b-5c479e77142c/connect/authorize |
| Token URL | https://main.open.ahcentral.com/fhirroute/patientauthv2/1821ee4d-7ef1-4cbd-a56b-5c479e77142c/connect/authorize |
| Default Scope | patient/*.read |
You receive the Client ID and Client Secret when you register your FHIR application in the Altera Developer Portal. For shared provider/patient sandbox credentials, raise a request via the Altera Support Widget with your Client ID and target sandbox. If unsure, set the OAuth Redirect URL to http://localhost/callback while testing. Always attempt to discover the Token and Authorization URLs dynamically from the /.well-known/smart-configuration endpoint before falling back to the URLs listed above.
Sandbox vs Production Comparison
| Aspect | Sandbox | Production |
|---|---|---|
| Target Domain | adpsandbox.ahcentral.com |
Customer-specific string |
| B2B Endpoints | Requires system token endpoints | Requires validated system endpoints |
| Approval Layer | Enabled post application creation | Requires Hospital IT Admin enablement |
| Data Isolation | Synthetic clinical records | Real HIPAA-covered PHI |
Configuration Reference
ConnectHealth supports multiple workflow types for this integration. Choose the one that matches your use case.
Standalone OAuth
| Field | Autofill | Required | Description |
|---|---|---|---|
Client ID |
No | Yes | Your unique application identifier. |
Client Secret |
No | Yes | Client secret for confidential clients. |
Authorization URL |
Yes | Yes | TouchWorks OAuth authorization endpoint URL. |
Token URL |
Yes | Yes | TouchWorks OAuth token endpoint URL. |
Scopes |
No | Yes | Space-separated list of OAuth scopes. |
Redirect URL |
Yes | Yes | Your ConnectHealth callback URL. |
FHIR Base URL |
No | Yes | The base URL of the specific practice's FHIR server. |
Setup Steps
- Register your application natively with Altera Digital Health and note the Client ID and Client Secret.
- Register your ConnectHealth redirect URI (callback URL) identically in the TouchWorks application settings.
- Obtain the FHIR base URL and OAuth endpoints automatically by reading from `/.well-known/smart-configuration`.
- Configure the Standalone workflow in ConnectHealth executing all the fields above.
- Test the authorization flow by triggering the ConnectHealth `/start` proxy endpoint.
Backend to Backend (B2B)
Unlike Epic or Cerner, TouchWorks actually supports B2B connections via either standard Client Secret (Basic Auth) or JWT assertion via JWKS Public Keys. ConnectHealth orchestrates both smoothly; define the Client Secret specifically to use Basic Auth, or leave it blank and ConnectHealth will fallback and seamlessly host the RS384 public key mapping.
| Field | Autofill | Required | Description |
|---|---|---|---|
Client ID |
No | Yes | Your unique application identifier. |
Client Secret |
No | Optional* | Used to execute Basic Auth workflow. If omitted, JWT assertion via generated JWKS Private Key triggers. |
Token URL |
Yes | Yes | TouchWorks OAuth token endpoint URL. Ensure it is a System URL, not a `patientauth` URL. |
FHIR Base URL |
No | Yes | The practice-specific FHIR base endpoint. Do not use Sunrise base URLs. |
Scopes |
No | Yes | System scope mappings (e.g. system/*.read or specifically fhir base strings). |
Setup Steps
- Register your application as a Backend/System component with TouchWorks.
- If executing Basic Auth: Paste your Client ID and Client Secret natively into ConnectHealth.
- If executing JWT: Let ConnectHealth cleanly generate an RSA key pair and register the resulting public JWKS URI in the portal.
- Ensure you do not accidentally target a `patientauth` URL with a server-to-server token request, or you will fail handshake verifications.
SMART on FHIR - Embed Launch
Contextual Launch flow utilized directly from within the TouchWorks clinical interface.
| Field | Autofill | Required | Description |
|---|---|---|---|
Client ID |
No | Yes | Your unique application identifier issued by the Developer Portal. |
Client Secret |
No | No | Required only if the app type is strictly registered as confidential. |
Setup Steps
- In the Altera Developer Portal, register your ConnectHealth Launch URL in the Launch URLs field (SMART Apps section):
https://your-connecthealth-domain/api/workflow/auth/{integrationId}/launch. This is the URL TouchWorks calls to initiate the SMART launch, passingissandlaunchparameters. - Also register your ConnectHealth OAuth Callback URL in the Redirect URIs field:
https://your-connecthealth-domain/api/workflow/auth/{integrationId}/callback. - Configure the Embed Launch workflow inside the ConnectHealth dashboard with the Client ID from the Altera Developer Portal.
- Your frontend app receives a short-lived
tokenIdfrom ConnectHealth after launch — exchange it using the/token/exchange/{tokenId}endpoint with your API key. - Test by launching your app from within the TouchWorks clinical interface.
How Launch URL Works
The launch URL is a critical component of the SMART on FHIR EHR Embed workflow. Here is the operational sequence:
Step-by-Step Launch Flow
- EHR Initiates Launch: When a provider executes your tool from within TouchWorks, a GET request reaches your specified launch URL housing:
iss- The TouchWorks FHIR server base URL context.launch- An opaque token dictating exactly who the provider is viewing.
- ConnectHealth Intercepts Launch: The ConnectHealth launch instance evaluates these parameters dynamically. Because TouchWorks SMART variables are highly isolated, ConnectHealth hits the
iss`/.well-known` endpoint live. - Authorization URL Generated: ConnectHealth formats a completely secure authorization redirection tunnel loaded securely with the State CSRF variables and native payload constraints.
- User Authorization: The provider's wrapper redirects naturally through TouchWorks to establish an ongoing authorization tunnel.
- Code Exchange: TouchWorks drops a payload back onto ConnectHealth bounding the authorization code. ConnectHealth automatically exchanges logic to yield the finalized native FHIR payload objects.
💡 Key Takeaway: Registering the exact OAuth Callback URL solves the entire heavy-lifting requirement natively. ConnectHealth handles all the backend proxy exchanges mapping down purely into our `/token/exchange` REST endpoint allowing your frontend to operate completely independent of the complex authentication protocols.
General Scopes
| Scope | Description |
|---|---|
patient/*.read | Universal read focused purely on linked patient persona context |
system/*.read | Background (B2B) universal read representing API broad data pipelines |
fhir | Core Altera FHIR API backend pipeline capability. Inject this aggressively for B2B. |
launch | Identify the active context payloads via Embed interactions natively |
launch/patient | Strict context variable specifically referencing patient payloads at runtime |
openid fhirUser | Standard OpenID connection identifying the direct user authentication layer |
Use Cases
Choose the workflow type that best matches your application's needs.
Patient-Facing Applications
Scenario: A direct third-party connection needs to establish clinical queries into TouchWorks following strict patient consent guidelines.
Recommended Workflow: Standalone OAuth
Best For: PHR aggregators, telehealth trackers, mobile consent portals
Recommended Scopes: patient/*.read openid fhirUser
System-to-System Orchestration
Scenario: Establishing massive integrations without single user logins leveraging JWT verifications mapped from automated systems.
Recommended Workflow: Backend to Backend (B2B)
Best For: Population health, predictive analytics pipelines, clinical NLP scans
Recommended Scopes: fhir fhirUser OR system/*.read
EHR-Embedded Clinical Modules
Scenario: Generating a fully immersed window loaded perfectly into TouchWorks utilizing direct provider context dynamically bound.
Recommended Workflow: Embed Launch (SMART on FHIR)
Best For: Decision support engines, contextual documentation add-ons
Recommended Scopes: launch launch/patient openid fhirUser patient/*.read
Get Your ConnectHealth API Key
Several ConnectHealth endpoints — Token Exchange, Backend Token, and Token Refresh — require a ConnectHealth API key passed as the x-api-key header. Without this header, these endpoints return 401 Unauthorized. Follow these steps to generate it.
Log in to the ConnectHealth Dashboard
Identify your cloud instance directly at your established deployment domain.
Navigate to Settings → API Keys
From the left nav, click Settings, then open the API Keys tab.
Create a New API Key
Click Create API Key, generate an identifier (e.g. touchworks-prod-client), and click submit.
Copy the Key Value
Store the key safely inside an AWS Secrets or Vault integration immediately to avoid losing visibility.
Append Header Requirements
Execute all requests with the exact x-api-key format parameter matching strictly against your token routes.
API Endpoints
Token Exchange, Token Refresh, and Backend Token endpoints require the ConnectHealth API Key passed explicitly into your call structures.
All API paths are orchestrated via your ConnectHealth endpoint directly mapping the UUID integration definition dynamically for TouchWorks.
Token Exchange
Resolve the transient TouchWorks tokenId to secure the active access payload dynamically.
curl
curl -X GET "https://<your-ch-domain>/api/workflow/auth/{integrationId}/token/exchange/{tokenId}" \
  -H "x-api-key: YOUR_API_KEY" \
  -H "Accept: application/json"
JavaScript (fetch)
const res = await fetch(
  `https://<your-ch-domain>/api/workflow/auth/${integrationId}/token/exchange/${tokenId}`,
  { headers: { "x-api-key": process.env.CH_API_KEY, "Accept": "application/json" } }
);
const { access_token, patient, scope, expires_in } = await res.json();
Backend Token (B2B)
Execute the system-to-system access handshake relying on configured Basic Auth or JWT pipelines.
curl
curl -X GET "https://<your-ch-domain>/api/workflow/auth/{integrationId}/token" \
  -H "x-api-key: YOUR_API_KEY" \
  -H "Accept: application/json"
JavaScript (fetch)
const res = await fetch(
  `https://<your-ch-domain>/api/workflow/auth/${integrationId}/token`,
  { headers: { "x-api-key": process.env.CH_API_KEY, "Accept": "application/json" } }
);
Token Refresh
Refresh an access token before expiry. Only works if the original token was issued with offline_access.
curl
curl -X POST "https://<your-ch-domain>/api/workflow/auth/{integrationId}/token/refresh" \
  -H "x-api-key: YOUR_API_KEY" \
  -H "Content-Type: application/json" \
  -d '{"refresh_token": "YOUR_REFRESH_TOKEN"}'
JavaScript (fetch)
const res = await fetch(
  `https://<your-ch-domain>/api/workflow/auth/${integrationId}/token/refresh`,
  {
    method: "POST",
    headers: {
      "x-api-key": process.env.CH_API_KEY,
      "Content-Type": "application/json",
    },
    body: JSON.stringify({ refresh_token: "YOUR_REFRESH_TOKEN" }),
  }
);
const { access_token, refresh_token, expires_in } = await res.json();
Response
{
  "body": {
    "access_token": "eyJhbGc...",
    "refresh_token": "dGhpcyBp...",
    "token_type": "Bearer",
    "expires_in": 3600,
    "scope": "patient/*.read",
    "patient": "patient-id-if-applicable"
  },
  "message": "Token refreshed successfully",
  "timestamp": 1718000000000
}
OAuth Start (browser-initiated)
Kickoff the patient or physician TouchWorks authorization screen via a safe wrapper tunnel.
curl (inspect redirect only)
curl -I "https://<your-ch-domain>/api/workflow/auth/{integrationId}/start"